 |

Using Ornamental Grasses
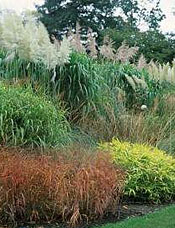 Although often overlooked, ornamental grasses can add grace and motion to your
garden thanks to their strap-like foliage that will sway even in the gentlest breeze. Many varieties also feature fluffy flowers and seed
heads that will last throughout the winter, attracting birds and adding winter interest to the garden.
Although often overlooked, ornamental grasses can add grace and motion to your
garden thanks to their strap-like foliage that will sway even in the gentlest breeze. Many varieties also feature fluffy flowers and seed
heads that will last throughout the winter, attracting birds and adding winter interest to the garden.Like other varieties of perennials, ornamental grasses come in many different textures, colors, sizes and flower forms. In addition to a varied collection of green hues, foliage and flower colors also include red, pink, purple, tan and white.
With sizes ranging from dwarf 1 foot varieties to 9 foot giants, these grasses can be used in containers or borders, as a groundcover or to create a living screen.
Site Selection
Most grasses prefer full sun to light shade and a well-drained soil, but some types will tolerate other conditions. Take note of your light and soil conditions and then check your plant tag or our online gardening catalog before you select your varieties.
Planting Instructions
Proper planting technique is instrumental to the overall health of your plants. Follow these simple instructions to make sure your ornamental grasses get off on the right foot:
- We recommend spacing your plants 1 to 3 feet apart, depending on the variety. This will give your grasses plenty of room to grow and fill in the space.
- Next, prepare the garden bed by using a garden fork or tiller to loosen the soil to a depth of 12-15 inches, then mix in a 2-4 inch layer of compost.
- Dig a hole twice the diameter of the pot the plant is in.
- Remove the plant from its container and place it in the hole so the top of the root ball is level with the soil surface.
- Carefully fill in around the root ball and firm the soil gently.
- Water thoroughly.
To ensure happy and healthy grasses, apply a thin layer of compost each spring, followed by a 2" layer of mulch to retain moisture and control weeds.
Appropriate watering is crucial, especially during the hot summer months. A deep watering 2-3 times a week will provide your grasses with the necessary moisture they need to thrive.
 Let Us Do the Planting
Take the hassles out of planting trees, shrubs, perennials & more with our Planting Service. We'll get your plants into the ground and off to a great start, worry-free. Visit our website to learn more. |
Identifying and Treating Tomato Diseases
Fast-spreading diseases like blight can be serious problems for the home gardener, especially when it comes to tomatoes. Below you'll find details on two of the most prevalent afflictions. If you see signs of these diseases or have any questions, feel free to contact our garden professionals right away.
LATE BLIGHT
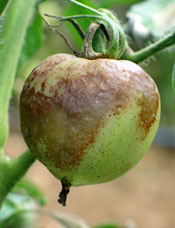 Potato Late Blight is the same disease that caused the great potato famine in Ireland during the 1800's and will also affect tomato crops.
Infected Plants
Symptoms of the disease include a water soaked grease spot on foliage or dark brown, almost black spots on the stalks or fruit (more photos here). Spores from infected plants can travel up to 40 miles in the air under the right conditions, so the Maine Department of Agriculture asks gardeners to destroy infected plants by burying or bagging them. This will prevent the spores from releasing in the air and spreading the disease.
Non-Infected Plants
For plants that have not been infected yet, the application of an organic fungicide is strongly recommended. We recommend Fung-onil or Immunox, among many approved solutions. After applying the fungicide, continue to monitor your plants for signs of infection.
BLOSSOM-END ROT
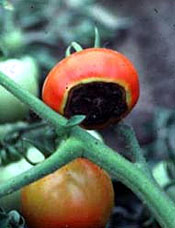 Extended periods of wet weather can produce Blossom-End Rot, a tomato disorder that is caused by low levels of calcium. When too much water is applied
to plants, the roots are deprived of oxygen and unable to produce the calcium they need for normal cell production.
Extended periods of wet weather can produce Blossom-End Rot, a tomato disorder that is caused by low levels of calcium. When too much water is applied
to plants, the roots are deprived of oxygen and unable to produce the calcium they need for normal cell production.Symptoms
Blossom-End Rot usually begins as a small water-soaked area at the blossom end of the fruit. This may appear while the fruit is green or during ripening. As the lesion develops, it enlarges, becomes sunken and turns black and leathery. In severe cases, it may completely cover the lower half of the fruit, becoming flat or concave.
Treatment
Protecting your tomato plants from overwatering and stimulating calcium production should be your focus. Apply a treatment of lime to help regulate the soil's pH and encourage calcium production, then mulch around the plants to keep soil moisture levels as consistent as possible.
A treatment of Rot-Stop from Bonide would also be beneficial.
|
|
|
|
 Tons of fresh plants are arriving this week in Yarmouth and Kennebunk. Save big on everything during our Summer Sale!  Hydrangeas 15% OFF  Clematis 20% OFF  Echinacea 20% OFF  Summer Phlox 20% OFF  Blueberries 15% OFF  Black-Eyed Susans 20% OFF |
 The 50th Yarmouth Clam Festival is this weekend! Take a break from the crowds and visit our flagship location to browse tons of great plants. Summer is here and your plants need water. We recommend 2-3 deep waterings per week, even when it rains (your plants will shed rain like an umbrella). |
 From the ultimate garden solution to perfect gifts, you're sure to find something great in our garden emporium!  Are slugs invading your garden? Fight back with Sluggo.  Summer diseases like cedar apple rust can cause havoc to your plants. Cure and prevent damage with Immunox. |