|
CONTACT
Fox Chapel/Blawnox
811 Boyd Ave, Ste 205
Pittsburgh, PA 15238
412-826-8600
Moon/Coraopolis
614 5th Ave
Coraopolis, PA 15108
412-389-9154
Greensburg
233 Old Airport Rd
Greensburg, PA 15601
412-826-8600
Washington DC/Virginia
21351 Gentry Dr., Ste 135
Dulles, VA 20166
866-535-6079
|
Dennis Piper & Associates
is focused on providing
the local service and attention you deserve,
delivered by a talented team of professionals.
We are a full-service local Pittsburgh CPA
firm providing
accounting, tax,
financial, and strategic
planning since 1998.
|
|
|
The QuickBooks Client Newsletter
Helping you grow your business with QuickBooks software
|
|
Greetings!
Now that the tax deadline crunch is behind us (for the time being), we can now direct our attention to some other things, like our monthly QB Newsletter.
April's offerng focuses on a very important feature, Purchase Orders, that if used correctly will help enable you to stay on top of your inventory process. |
|
|
Preparing Purchase Orders Precisely
Modifying the default template makes tracking easier, more accurate.
Part of the reason for QuickBooks' success is its exceptional flexibility. By allowing users to turn features and preferences on and off, the same software can be used by a wide variety of business types and sizes.
In some cases, the default settings that QuickBooks supplies will work fine for your company. This is not necessarily true in the case of purchase orders, since the whole inventory procurement process is so complex, and users can have such a diverse range of needs.

Figure 1: QuickBooks 2013's default
Create Purchase Orders screen. You can see that formatting options are available when you click the
Formattingtab.
So before you order your first widget, make sure that your purchase order form is designed to accommodate all of the information you want to record and track, with no unnecessary data fields to confuse staff.
Working With Templates
There aren't many program preferences to check. If you can open a purchase order, you're set. If not, go to Edit | Preferences | Items & Inventory and be sure that the box next to Inventory and purchase orders are active is checked.
What you want to find first is the Additional Customization screen for the Custom Purchase Order Template. This is easily accessed from the Create Purchase Order screen itself in QuickBooks 2013, but if you're using an earlier edition, go to Lists | Templates | Custom Purchase Order Template. Double-click on it to open the Basic Customization page. Here, you can add a logo, change fonts and colors, etc. But go ahead and click on theAdditional Customization button at the bottom of the screen. This window opens:
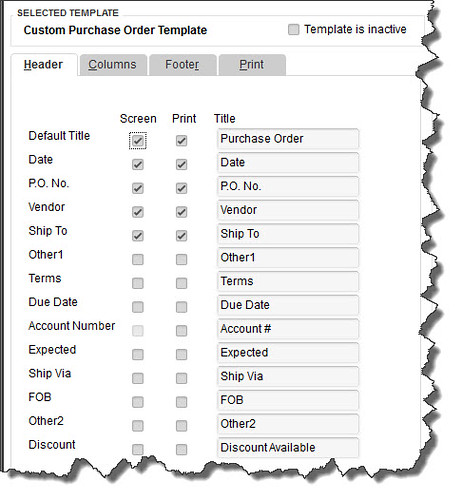
Figure 2: The left pane of theAdditional Customization window contains additional fields that you might want on your purchase orders, like Ship Via andTerms.
(Tip: If you want to design multiple purchase order templates, click Manage Templates on the Basic Customization screen, then Copy on the Manage Templates page. Rename the form and make your modifications. This version will always be available as an option when you create purchase orders.)
Making It Yours
Each of this window's four tabs opens a new screen that gives you customization control over a different element of the purchase order form: the top, bottom and midsection, and printing options. You simply check the boxes next to the fields that you want to add to the current form (be sure to check both columns if you want the fields to appear both onscreen and in your printed versions; sometimes, one is not an option) and uncheck any you want to delete.
If the right pane of this window, a dynamic preview changes to reflect each addition or deletion. And when you've finished altering the set of fields, you can see an actual print preview. Close that and keep clicking OK until you get back to the Templateswindow.
This simplicity and ease carries over into the more cosmetic elements of your purchase order. Make sure the template you want to redesign is highlighted and click Templates | Create Form Design. QuickBooks walks you through the process of adding a logo and background, colors and fonts, and a grid style, and it lets you apply this same theme automatically to all of your forms. (You can modify your design similarly on the Basic Customizationpage, minus the wizard-like approach and the background options.)
Simple But Complicated
One more comment about the QuickBooks 2013 purchase order screen. Beyond making your formatting options available in the "ribbon," it also moves you through purchasing to the receiving process. With the appropriate purchase order open, click Create Item Receipts in the ribbon. This window opens, with the correct vendor name selected. When you click in the Item field, this small window appears:

Figure 3: Click Yeshere and select the correct PO, and QuickBooks fills in the data. If you check theBill Received box, the Enter Bills window opens.
QuickBooks' purchasing and receiving tools makes your inventory-tracking job easier, but you still need to understand the workflow. We encourage you to let us work with you as you begin managing inventory - or to contact us if you're tangled up in what can be a very challenging element of QuickBooks. |
|
|
Sincerely,
Dennis Piper
Dennis Piper & Associates, P.C. |
|
|