Greetings!
Greetings from your farm. Another lovely day here, we're thankful that the humidity has finally taken leave. We harvested our first crop of beets this week. Our first planting was washed out due to an unfortunately timed deluge the day after we seeded. We grow three types of beets. Most of the beets for the shares this week are an Italian heirloom variety called Chioggia (pronounced "key-yoga") They are sometimes called candy stripe beets because when you cut in to them they have alternating pink and white rings. If you don't get Chioggia beets you'll be receiving red or golden beets. Some of the beets have minor cracks which are purely cosmetic; just cut off any cracks when you're trimming the beets. If you're one of our members who thinks they don't like beets do your hard working farmers a favor and taste these. We're convinced that people who think they don't like beets have only had the canned type which are overly sweet and mushy. Fresh beets have a delightfully earthy flavor. They're even great raw, just slice them really thinly and dress lightly with a vinaigrette and fresh herbs.

One in a million...a perfect Cherokee Purple heirloom tomato
Our heirloom tomatoes are just starting to ripen so hopefully we'll be sending them out in next week's shares. They are really delicate and prone to cracking. Instead of sending them in your share boxes we're planning on sending them in a separate box and letting everyone know how many to take. They're likely to be a mix of varieties so we'll also be sending details on which types you'll be getting.
2011 CSA Appreciation Party

Remember to RSVP for the Harvest Party at the farm on September 10th. Click here to RSVP. If you can't make it up to the farm look for details on our plans for a Chicago area party; probably sometime in October.
|
|
|
Red Potatoes

The potato is a nutritionally rich tuberous root vegetable, and is a good source of starch, vitamins, minerals and dietary fiber. It is one of the most widely grown perennial crops, with over 100 edible varieties.
Storage: Cool, dry and dark place in a burlap or paper bag. Exposure to sunlight and excess moisture will cause potatoes to sprout. Potatoes should not be stored in the refrigerator, as their starch content will turn to sugar giving them an undesirable taste. In addition, do not store potatoes near onions, as the gases that they each emit will cause the degradation of one another.
Roasted New Potatoes with Caramelized Onions with Truffle Oil
1 pound small, new potatoes, scrubbed, quartered
1 large onion, peeled, thinly sliced - Caramelized (see below for instruction)
3 Tbsp olive oil
Kosher salt and freshly ground black pepper
Several shakes of white truffle oil, about 1/2 teaspoon
Preheat oven to 400°F. Put onions and potatoes in a sturdy roasting pan. Pour olive oil over them and toss well to coat. Liberally sprinkle salt and pepper over the potatoes and onions. Spread the potatoes out so they are in a single layer in the pan. Place in oven. Cook for 40 minutes or until the potatoes are lightly browned and cooked through.
Place potatoes and onions in a serving dish. Sprinkle well with truffle oil. Toss to coat.
Serves 4.
Caramelizing Onions
large onions, yellow, white, or red
Olive oil
Butter (optional)
Salt
Sugar (optional)
Slice onions. Use a wide sauté pan for maximum pan contact with the onions. Coat the bottom of the pan with olive oil, or a mixture of olive oil and butter (about 1 teaspoon per onion). Heat the pan on medium high heat until the oil is shimmering. Add the onion slices and stir to coat the onions with the oil. Spread the onions out evenly over the pan and let cook, stirring occasionally. After 10 minutes, sprinkle some salt over the onions, and if you want, you can add some sugar to help with the caramelization process. (add only about a teaspoon of sugar for 5 onions, you can add more.)
Let cook for 30 minutes to an hour more, stirring every few minutes. As soon as the onions start sticking to the pan, let them stick a little and brown, but then stir them before they burn. The trick is to let them alone enough to brown (if you stir them too often, they won't brown), but not so long so that they burn. After the first 20 to 30 minutes you may want to lower the stove temperature a little, and add a little more oil, if you find the onions are verging on burning. A metal spatula will help you scrape up the browned bits from the bottom of the pan as the caramelization proceeds. As the onions cook down, you may find you need to scrape the pan every minute, instead of every few minutes. Continue to cook and scrape, cook and scrape, until the onions are a rich, browned color. At the end of the cooking process you might want to add a little balsamic vinegar or wine to help deglaze the pan and bring some additional flavor to the onions.
|
|
Cabbage
 Cabbage comes in its own carrying case. You'll want to remove the outer few leaves, which may look a little damaged. These wrapper leaves help protect the cabbage during storage and transportation; just simply peel back and you'll find the center leaves beautifully intact.
You'll want to core the cabbage. We recommend slicing the cabbage into quarters through the base. Slice the core out of each cabbage quarter, this is easily done with an angled "v" cut. Even though the inside of cabbage is usually clean since the outer leaves protect it, you still may want to clean it.
Storage: Refrigerate cabbage in the crisper drawer. A plastic bag will help retain moisture, however, not necessary. Do not remove outer leaves before storage.
Sweet Cabbage Slaw with Green Onion and Parsley
1 head or about 6 cups cabbage, coarsley chopped
3/4 cup chopped parsley (or more)
3/4 cup thinly sliced green onion (or more)
1/4 cup extra virgin olive oil
1/4 cup white balsamic vinegar or white vinegar
1/2 cup sugar
salt to taste
freshly ground black pepper to taste
Optional - Slivered almonds, lightly toasted
Cut out core from cabbage, thinly slice and coarsely chop slices until you have about 6 cups chopped cabbage. Wash and coarsely chop parsley, and thinly slice green onions.
In small bowl or glass measuring cup, stir together the olive oil, white balsamic vinegar or white vinegar, sugar, salt, and pepper.
Put chopped cabbage, chopped parsley, and sliced green onions into salad bowl and toss to combine. Add just enough dressing to moisten salad, and toss again. (You may not need all the dressing.) Adjust seasonings and serve. This will keep for a day or so in the fridge, although we think it's better freshly made when the cabbage has more crunch.
|
|
Chioggia Beets
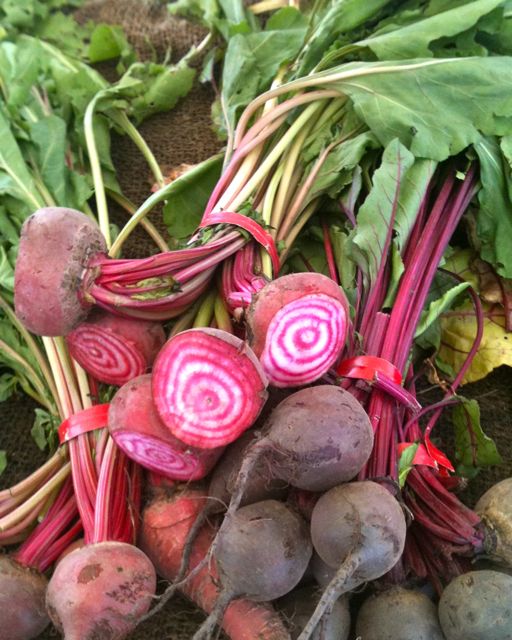
Beets are very versatile and are a great source of folate, B Vitamin, which is essential for normal tissue growth and for a healthy cardiovascular system.
Trace minerals lie just beneath the skins, no need to peel the roots, lightly scrub clean.
Beet Greens
The greens are best used when they are fresh, toss them into a raw salad of mixed greens or lightly saute or steam. Beet greens are especially rich in vitamin A, C, calcium, and iron. The greens this week do have some sun damage which doesn't affect the flavor.
Storage: Store beets, unwashed, in the refrigerator. Cut off the beet greens leaving about an inch of the stalk on the top of the root, this will help keep moisture in the root. Keep the roots in a plastic bag in the hydrator drawer. Store beet greens, unwashed, wrapped in a damp cloth or in a plastic bag.
Serving Ideas:
- Slice steamed beets and serve at room temperature tossed with olive oil and a dash of salt and pepper, or a simple vinaigrette.
- Oranges complement beets well.
Beet Salad
1 bunch beets
juice of 1 orange
1 tablespoon butter, softened
1 teaspoon peanut oil
1 teaspoon dark sesame oil
1 teaspoon hot chili oil
1-2 tablespoons soy sauce
salt and pepper to taste
Cut greens off of the roots and gently scrub the roots, and wash the greens. Cut stems into 3-inch pieces and coarsely chop the greens; set aside in separate piles. Steam beet roots until tender, about 20 minutes, and cool briefly and cut into wedges. Toss with orange juice, butter, and pepper to taste; cover to keep warm. In a skillet heat oils and saute the stems for 2-3 minutes. Add greens, cook, tossing often. Toss stems and greens in soy sauce and add pepper to taste. Arrange beets over the greens and stems. Pasta with wilted beet greens, goat cheese, and raisins 1 clove of garlic, minced 1/3 cup golden raisins 1/3 cup fresh lemon juice 4 TBS olive oil 1 1/2 cups finely chopped vadillia onion 1 bunch beet greens (about 6-8 ounces), stems trimmed, leaves coarsely chopped 1 1/2 tsp grated lemon peel (use a microplane or the smallest holes on a cheese grater) 1 lb orecchiette (little ear-shaped pasta) or other pasta of your choice 5 ounces soft fresh goat cheese Combine raisins and lemon juice in small bowl. Set aside. Heat 2 tablespoons oil in heavy large pot over medium-low heat. Add onion and sauté until tender, about 8 minutes. Add garlic and sauté until fragrant, about 1 minute. Add beet greens and raisin mixture. Cover and cook until greens wilt, about 5 minutes. Season greens to taste with salt and pepper. Meanwhile, cook pasta in large pot of boiling salted water until tender but still firm to bite. Reserve about 1/4c of pasta cooking water and place in blender with remaining olive oil. Return pasta to pot. Toss pasta with blended pasta water and oil. Add greens and goat cheese. Toss to combine. Season to taste with salt and pepper. Transfer pasta to large bowl and serve. |
Summer Squash  Summer Squash & Roasted Garlic Dip
Makes about 1 cup of dip About 1-1/2 cups of cut up summer squash 4 Roasted garlic cloves - Or more if you like garlic as much as we do. 1/4 red onion cut into strips 1 tbsp capers Juice of 1/4 of a lemon to taste Chopped jalapeno to your heat tolerance 3 tbsp shredded asiago cheese Salt and Pepper to taste Extra Virgin Olive Oil Heat your oven to 400 and put the garlic drizzled with evoo in the oven for roasting for 30-35 minutes. Heat a saucepan to medium heat with some evoo. Start sauteing the red onion with the cut summer squash. Add lightly some salt & pepper to season the veggies. Add about 3-4 tbsp of water while sauteing to help make the squash soft. Continue to stir the squash occasionally for about 8 minutes. Cover the veggies between stirs so they can steam. Take the saucepan off the burner so the squash can cool down. Keep covered in pan. Wait until your roasted garlic is done. During this time, you could chop up your jalapeno. When garlic is done, take out of oven and let cool a bit. Put all the squash into a food processor along with the capers, lemon, jalapeno, asiago cheese, and roasted garlic. Puree until it looks dip like. Taste. The salt from sauteing the squash should be enough, if not add more salt or your favorite seasoning salt. Add more lemon for more kick. Adding the jalapeno even if it is a small amount is important because it adds some kick to the dip. Vichysquash 1 medium onion, chopped 1 TBS butter 6 medium yellow squash, cut into chunks 1/2 cup chicken stock (or vegetable) 1 cup whole milk salt & pepper to tast Summer savory to taste yogurt & chopped green onion tops for garnish Saute onion in butter until translucent. Add squash and stock; simmer until squash is tender. Puree in blender. Return to pot and add milk and seasonings. Serve hot or cold. Top with yogurt and/or onion tops. Freezes well, simply transfer cooled contents into a freezer safe container, label and enjoy at a later date.
Recipe courtesy of Beverly McClellan, Harvest Moon CSA Member (This recipes has been adapted from the Memphis Symphony League Gracious Goodness Cookbook, recipe by Mrs. Ted Bratton) |
|
Cucumbers
 Quinoa Tabbouleh Salad with Parsley and Mint Makes 4-6 servings 3/4 cup quinoa 1 1/2 cups water pinch of salt for quinoa cooking water 1 cup chopped cherry tomatoes 1/2 cup chopped parsley 1/2 cup chopped cucumber, cut into 1/2 inch pieces 1/4 cup extra-virgin olive oil 3 T fresh squeezed lemon juice 1/4 tsp. ground cumin pinch ground cinnamon 1/2 tsp. salt 1/4 - 1/2 cup finely chopped fresh mint Put quinoa into a fine-mesh strainer and rinse well with cold water until no more foam appears. (You can use a paper towel inside a regular strainer if you don't have one that's fine enough. Check the package to see if your quinoa needs to be rinsed.) Bring the water to a boil in a small saucepan. Add pinch of salt, stir in quinoa, reduce heat to the barest simmer and cook 12-15 minutes or until the water is absorbed. Cover the quinoa and let it sit for 5 minutes more. (Check quinoa package for cooking directions). While quinoa cooks, chop cherry tomatoes into small pieces. If the tomatoes are very juicy, let them drain in the same colander you used for the quinoa. After it sits for 5 minutes, put the cooked quinoa into the bowl you're using for the salad and let it cool to room temperature for 20-30 minutes. While quinoa cools, chop cucumbers into 1/2 inch pieces. Wash the parsley, spin dry or dry with paper towels, then finely chop until you have 1/2 cup chopped parsley. Whisk together the olive oil, fresh lemon juice, ground cumin, pinch of cinnamon, and 1/2 tsp. salt to make the dressing. When quinoa is cooled to room temperature, stir in the cucumber, drained tomatoes, and parsley, then add just enough dressing to moisten the salad, about 4-5 T of the prepared dressing (you will use some of the reserved dressing later.) Cover the salad, refrigerate, and let flavors blend for 30 minutes or as long as a few hours if you're making this ahead. When you're ready to serve the salad, remove from refrigerator and let it come to room temperature while you wash mint, spin dry or dry with paper towels, and finely chop to make 1/4 - 1/2 cup chopped mint. Stir in chopped mint, then taste the salad and add more of the reserved dressing until the flavor tastes fresh (you may not need all the dressing.) Season with a little more salt if desired, and serve. 
Adam and Padraic counting cucumbers (yes, someone has to do that).
Which deserves a refreshing glass of Agua Fresca! Cucumber Agua Fresca
2 1/2 Cups coarsely chopped seeded and peeled cucumbers (about 2 medium)
2 Cups water**
1 Cup ice cubes
1/2 Cup sugar
1/3 Cup fresh lime juice
1 large pinches of salt
Optional - a few sprigs of rosemary, mint, or lemongrass
Combine all ingredients (in 2 batches if necessary) in blender and blend until sugar dissolves and mixture is smooth but slushy, about 2 minutes. Serve in tall glasses over ice.
**sugar doesn't dissolve in cold water well; bringing 1 C of the water to a boil and dissolving the sugar in that (this way the sugar stays in suspension), and then either cooling it down before blending, or substitute more ice for the remaining water when blending. |
|
Sweet Corn
 Freezing Sweet Corn:
The sugars in the corn begin to turn to starch as soon as it's picked. So the sooner you freeze the corn after its been picked, the more sweetness it will retain. The ears should not be too large. Very large ears are also typically less sweet. The next step is to husk the corn.
After the corn is husked it needs to be cleaned to remove as much of the silk as possible. A very soft vegetable brush works best for this step.
The next step is to blanch the corn. Bring a large stock pot filled about half full with water to a boil. When it boils add as many ears as you can fit making sure they all stay submerged in the water. Adding the corn will stop the boiling process. Place a lid on the pot. Allow the corn to come back to a rapid boil. This may take 10 minutes or more. Keep an eye on the pot because once it reaches a boil the corn is blanched. Remove the corn immediately from the hot water using tongs. Since you will more than likely need to blanch your corn in multiple batches, you will want to save the hot water in your stock pot. This not only conserves water but also greatly shorten the amount of time it takes to bring the water to a boil. You may need to add more water to your pot as you go.
While your waiting for your corn to come to a boil you need to prepare for the next step which is cooling the corn. Fill your sink with cold water. If you have a two compartment sink, fill one side with cold water and the other side with ice water. If you don't have a two compartment sink you can fill a large bowl or tub with the ice water.
Place the corn into the sink filled with cold water. After the corn is blanched it is critical that it is placed immediately into cold water. This will stop the cooking process. You will lose your fresh corn flavor if you allow the corn to cook to much. Next transfer the corn to the ice water and allow it to cool completely.
The next step is cutting the corn from the cob. This is the only step that requires a little skill. After doing a couple of ears, you'll get a feel for how to get the corn without cutting into the cob. A small sharp knife is the important key for this step. A pairing or vegetable knife works best. After you cut off all corn from the cob, turn your knife so that the blade face outward and scrape down the cob. This will remove all the sweet juice and bits of corn that remain on the cob. This step is a bit messy but you'll be getting every bit of your sweet delicious corn off the cob. You will need a large bowl to cut into. It works best if you place the bowl in your lap while I cut off the corn. Do whatever feels comfortable to you.
After you finish cutting off the corn from the cobs, scoop the corn into zip lock freezer bags. Lay the bag on it's side and flatten out the corn. Press out as much air as possible before closing the bag. Flattening the bag not only helps you to remove the air but it also makes it much easier to stack the corn into your freezer.
Place bags into the freezer and enjoy your sweet corn all year long!
* If you don't want to use the entire bag of corn at once. We recommend freezing the corn first on a baking sheet prior to putting it into the freezer bags. Corn Pudding 4 cups corn kernels (about 5 ears of fresh)
4 large eggs
1 cup half and half
1/2 cup whole milk
4 tablespoons sugar
1/4 cup (1/2 stick) butter, room temperature
2 TBS all purpose flour 1/4 cup basil, chopped 1 tsp Tabasco
2 tsp baking powder
2-3 TBS Parmesan Cheese, shredded
1 tsp salt Panko Bread Crumbs, or anytime of bread crumbs will work.
Preheat the oven to 350 degrees. Place the butter in a baking dish (an 8-by-8-inch glass baking dish or iron skillet works well) and slide into the oven so the butter melts while the oven is preheating.
Using a box grater, coarsely grate the kernels off four ears of corn. Use a sharp knife to cut the kernels from the remaining ears. Combine the corn kernels, sugar, half and half, milk, flour, baking powder, basil, tabasco, Parmesan Cheese and salt in a large mixing bowl. Lightly beat the 4 eggs and add to the mixture.
When the oven has preheated and the butter in the baking dish has melted, carefully tilt the melted butter from the baking dish into the corn mixture and combine with a few swift strokes. Then tilt the buttered corn mixture back into the baking dish. Sprinkle the top with panko crumbs. Bake for 55 to 70 minutes, until a golden crust has formed and the interior has set. Makes 8 side-dish servings. |
|
Bok Choy
 Bok Choy resembles collards and could be described as a non-heading cabbage. Bok Choy is a rich source of many vital phyto-nutrients, vitamins, minerals and anti-oxidants. It is often touted as the garden vegetable highest in calcium. Whether it is true you can be confident that Bok Choy is an excellent source of vitamins A, B-complex and C. Cucumber and Bok Choi Salad 2 medium sized cucumbers 1 cup bok choi greens ¼ Feta cheese 1 TBS chopped dill ½ cup Tzatiki (recipe follows) Salt and pepper Peel cucumbers and slice lenhthwise. Scoop out seeds with a spoon and cut cucumbers in to ¼ slices Chop bok choi greens horizontally in to thin ribbons Toss with Tzatiki and top with Feta and dill, season to taste with salt and pepper.
Bok Choi and Summer Squash Salad
1 T butter
1 summer squash, cut in to 1 inch pieces
5 cloves garlic, minced
1 C chopped bok choi stems
salt and pepper
Melt butter in a sauté pan, add squash and cook over medium high heat until lightly browned. Try to not turn the squash until it starts to caramelize so it doesn't break apart but be careful not to let it burn
Add garlic and lower heat to medium low, cook for 2 to 3 minutes
Add bok choi stems, toss, remove from heat and season with salt and pepper.
|
Collard Greens 
Collards have cabbage and kale characteristics, collards, are most often associated with soul food. Cooked pretty much the same since their introduction and have been raised almost exclusively in the South.
Preparation: Do not be afraid to wash more than once, collards are invisibly sandy. Trim off the heaviest bases. Cut into strips if eating them raw, no need to cut into strips; just cut off leaves ands stems into half inch pieces and cook.
To Cook: Collards are particularly delicious in soups and stews. Season forcefully with garlic, onion, chiles, ginger, anchovies or Indian spices. For a medium-firm texture, simmer in seasoned broth for 15 to 30 minutes. Blanch for a milder effect suitable for stuffing or fillings.
Collard Green Olive Pesto
1 bunch collard greens
5-6 large brine-cured green olives (2 ounces), pitted
2 garlic cloves, chopped
1/3 cup water
1/2 teaspoon balsamic vinegar
Scant 1/2 teaspoon salt
1/4 teaspoon cayenne
1/4 teaspoon black pepper
1/2 cup extra-virgin olive oil
1/2 cup finely grated Parmigiano-Reggiano
Bring a 6- to 8-quart pot of salted water to a boil. Meanwhile, cut stems and center ribs from collard greens and discard. Stir collards into water in batches, then simmer, uncovered, stirring occasionally, until tender, about 15 minutes. Transfer collards with tongs to a colander to drain, gently pressing on greens to extract excess water. (If making pasta, reserve water in pot for cooking pasta.) Coarsely chop collards.
Blend olives and garlic in a food processor until finely chopped. Add collards, water, vinegar, salt, cayenne, and pepper and pulse until finely chopped. With motor running, add oil in a slow stream. Turn off motor, then add cheese and pulse to combine. |
|
|
|
|
|


