 "Believe it or not, over 80% of assistive technology solutions are fast and low-tech," notes Dr. Therese Willkomm (director of AT in New Hampshire and author of numerous works on homemade AT). "But when we hear the word 'technology,' we think of a computer, an iPad, a wheelchair or a speech generating device. Yet keeping it fast, simple, and inexpensive is often what it's all about." "Believe it or not, over 80% of assistive technology solutions are fast and low-tech," notes Dr. Therese Willkomm (director of AT in New Hampshire and author of numerous works on homemade AT). "But when we hear the word 'technology,' we think of a computer, an iPad, a wheelchair or a speech generating device. Yet keeping it fast, simple, and inexpensive is often what it's all about."
This edition of ATPN is dedicated to that 80%, and to the spirit of ingenuity behind every solution!
|
|
South Carolina's Make-and-Takes for Teaching the Arts
Workshops on adapted art and adapted music offer low-tech tools and ideas for immediate application
 A couple of years ago South Carolina's Assistive Technology Program (SCATP) Director Carol Page (Ph.D, CCC-SLP, ATP) decided it was time to branch out from offering "Trash to AT Treasures"--her standard low-tech AT fabrication workshop. She was interested in doing something different. For help thinking outside the box, she began brainstorming with her staff; together they realized they had offered many workshops to meet standard curriculum activities for students with disabilities--AT for reading, writing, and math--but what about art and music? A couple of years ago South Carolina's Assistive Technology Program (SCATP) Director Carol Page (Ph.D, CCC-SLP, ATP) decided it was time to branch out from offering "Trash to AT Treasures"--her standard low-tech AT fabrication workshop. She was interested in doing something different. For help thinking outside the box, she began brainstorming with her staff; together they realized they had offered many workshops to meet standard curriculum activities for students with disabilities--AT for reading, writing, and math--but what about art and music?
Page was inspired by the work of Theodore Mickens, an art teacher in Greenville, SC who is well known for adapted art strategies. So in 2010 she brought Mickens to the SCATP resource center to provide a workshop. She noted, however, that his projects required large spaces and equipment not everyone might readily have (such as using a plastic toddler pool for remote control car painting. [See an inspiring picture of this at Mickens's Web site]). With Mickens's permission she began thinking how to adapt some of his ideas on a smaller scale for the classroom and for home. In 2011, SC AT Program's Adapted Art Make-and-Take and Adapted Music Make-and-Take were born.
 | | Remote control car painting |
For music, Page collaborates with Erin Bellinder who has a BA in music and runs the Bridges program at the Therapy Place, a rehabilitation center that has her routinely teaching and implementing creative solutions with children under age 6. Page also works with local Kindermusik Director Ally Trotter. For both art and music workshops, SCATP's goal is for participants to come away armed with adapted tools and instruments that they can put to immediate use with specific individuals they know. Everyday materials, dollar store goods, as well as freeware are demonstrated and/or provided.
 | | Shakers made with macaroni and various plastic containers. The wristband is a scrunchie hair tie attached with Velcro. |
Last year 15 participants attended each workshop. They were parents, special educators, and art and music teachers, mostly people who routinely work with children with significant disabilities. Some had not been to the SCATP resource center before, and while they were there they also learned about the device loan program and other SCATP services. The workshops were held in the resource room with many AT products and SCATP customized adaptations on display.
 | Busy adapted music workshop attendees in the resource room
|
While Page goes over numerous advantages to low-cost AT solutions (i.e. "the simplest solutions are usually the best"), at the outset of each workshop she also reminds attendees of two low-tech project considerations to keep in mind:
1) it must be worth your effort or time, and
2) what looks low-cost may end up expensive once needed supplies and equipment are purchased.
Consequently most of SCATP's make-and-takes are fast and constructed from materials found around the house. "But we do meet a lot of people who aren't afraid to adapt things for switch use (and there's a big need), so that's probably the highest tech thing we do all day" (check out SCATP's no-soldering-required switch recipe!) Page also demonstrates Tux Paint, an engaging freeware application, and shows how it may be accessed using Camera Mouse (also freeware) for children who need a hands-free way to create.
 | | Switch adapted spin art |
To get the word out, SCATP advertises the workshops using their Web site, listserv, as well as the listservs of several school districts. The program provides all the materials needed for the projects and what participants create they take home with them. To offset program costs, SCATP charges $10 for the Adapted Art workshop. "We want people to feel like when they leave, 'I can do this! This isn't going to cost me a small fortune and these aren't materials I can't find!'"
For more adapted art and music ideas, AT Program News readers can email Carol Page for a copy of SCATP's Adapted Art and Adapted Music Power Points. Page is with the USC School of Medicine, Center for Disability Resources, Department of Pediatrics, University Center of Excellence in Developmental Disabilities. Contact her to learn how to create paintings with a light box, a hanging frame for one-handed music adaptations, and much much more!
|
Make an iPad Stand in Under 3 Minutes!
A low-tech recipe from AT in NH's Therese Willkomm, Ph.D.
Therese Willkomm--oft-referred to as the "MacGyver of AT"--has done it again. Proving that high-tech gizmos are often improved with low-tech solutions, she has created an adjustable, durable, portable, low-cost iPad stand that--unlike a lot of expensive commercial alternatives--works for individuals who experience various disabilities.
 | | Dr. Willkomm's iPad stand: the iLean |
The stand weighs almost nothing, incorporates a non-skid bottom to prevent sliding around, and collapses flat to easily fit into a student's backpack or book bag. Step-by-step instructions are available at this AT in NH Web page PDF, and Dr. Willkomm demonstrates construction on You Tube (below).
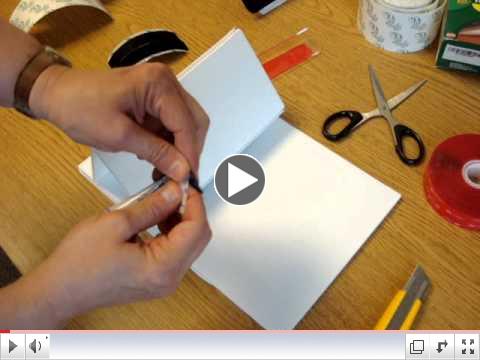 | Dr. Willkomm making her iPad stand on
You Tube. |
Tools and Materials Needed
- Two 8"X12" pieces of corrugated plastic board (Stratocore is one trade name) that have been cut so that the grain of the corrugated board runs the long way. Note: this is very important since this project will require you to score against the grain in order to obtain a rigid hinge.
- Two 6" pieces of ¾" hook Velcro
- One 6" piece of ¾" loop Velcro
- One 4" piece of Corner Guard (plastic corner wall protector)
- 8" of clear ½" double-sided, clear, VHB Tape (stands for "very high bond")
- 4" of ½" clear VHB Tape
- Two 6" pieces of Hold-It Tape
- Scissors
- Utility knife
Options for construction include the use of Velcro One-Wrap to attach the stand to your thigh;
 | | iPad stand attached to a thigh with Velcro One-Wrap |
also an Incase Magazine Jacket Cover to more firmly secure the device to the stand's adjustable support.
 | iPad attached to stand with the elastic of an Incase Magazine Jacket Cover
|
The stand is one of 50 ways to adapt the iPad that Dr. Willkomm lays out in one chapter of her upcoming book: Beyond Duct Tape and Velcro--Creating Assistive Technology Solutions in Minutes--Part II (due this December). Dr. Willkomm's first book, Make a Difference Today--Assistive Technology Solutions in Minutes is currently available from RESNA and contains 618 pictures for creating hundreds of solutions using everyday tools and materials. Both books address the challenge of coming up with solutions quickly and affordably for persons who experience physical, sensory or cognitive impairments.
Thanks to Dr. Willkomm for this great back-to-school contribution!
|
|
West Virginia's Marketing Strategy to Seniors: A Low-tech Circular!
 by Regina Mayolo, C.A.P.S. by Regina Mayolo, C.A.P.S.
Several years ago, West Virginia AT System (WVATS) was part of a home assessment project funded by the USDA, a component of which was to provide assistive devices to help older adults age in place. The project uncovered Appalachian cultural barriers to seniors adopting home assessment recommendations. For example we often heard:
- I don't need to move the laundry--I've been going up and down those steps just fine for 50 years.
- I don't need more lighting--I have lots of windows.
- My house isn't cluttered--I know where everything is.
- Don't need 'em (threshold ramps)--only guests stub their toes.
- I like my house just the way it is.
Not surprisingly, cultural issues also meant that project participants were reluctant to use higher-end devices and were more likely to use low-cost, low-tech devices. For instance, the $3 jar popper was almost universally preferred over the fancy electric jar opener. Indeed, it became clear that conventional thinking about what constitutes an assistive device needs to expand. After all, a simple toaster oven is sometimes more useable than a much more expensive oven unit; light switch extension handles, threshold ramps, and offset hinges can often eliminate the need for extensive (and unwelcome) home modifications; inexpensive press lights can make hallways or cabinets safer and easier to use. Put simply, low tech is often good tech.
One off-shoot to this awareness is a new approach to WVATS's marketing material to seniors. As a part of the home assessments project, WVATS developed a low-cost low-tech pamphlet keeping the proclivities of the audience in mind. The pamphlet is styled to look like a sales circular for a newspaper--a familiar form of supermarket advertising--rather than an academic education piece or bit of human services outreach.
 | Sample of the WVATS brochure
|
This is one way that WVATS has worked to incorporate an understanding of cultural issues into its outreach--a sensitivity that enables the program to now make recommendations that are more likely to make a difference. Success is reflected in comments from participants and family members:
- That's the first bath I've had in six months.
- I haven't been able to use that door for years.
- I didn't know how dark it was 'til that light went in.
- I can help my husband get a bath without breaking my back.
- Now I don't have to worry about Mom so much.
- No one's ever given me nothing before.
- Thank you for caring what happens to me.
Regina Mayolo is a technical assistance specialist for the West Virginia Assistive Technology System. The WVATS Low-Cost Low-Tech Pamphlet is available for download at this WVATS Web page. |
|
Low-tech Transitions Back to School
Strategies, ideas, and resources for easing a child into new routines
by Randi Sargent, parent and AT advocate
 For many of us who support students with special needs, back to school either comes too quickly or not quickly enough. After a summer of relaxed schedules and vacations, we need to prepare our kids for "back to school" and for our kids who rely on assistive technologies, this involves more than a trip to Target for markers and paper. Read on to learn about visual strategies and low-tech assistive technology tools you can use to help kids transition smoothly to a classroom and minimize back-to-school anxiety. For many of us who support students with special needs, back to school either comes too quickly or not quickly enough. After a summer of relaxed schedules and vacations, we need to prepare our kids for "back to school" and for our kids who rely on assistive technologies, this involves more than a trip to Target for markers and paper. Read on to learn about visual strategies and low-tech assistive technology tools you can use to help kids transition smoothly to a classroom and minimize back-to-school anxiety.
Create Visuals to Illustrate New School Routines
Visual supports, such as schedules and people locators, help kids with special needs get back into or learn a new school routine. These can be made in low-tech ways using magazine pictures, photos and picture symbols from Boardmaker or other free sources. To familiarize a child with a new environment, get or take pictures of the teacher, classroom, cafeteria, bathroom, gym, playground, and other key areas around school. Use these to introduce the new environment and later to make the daily classroom visual schedule. For purchase, there are even pre-made bracelets available with classroom routine symbols! Parents can make wearable/changeable schedules that shows daily after school activities and therapies.
To teach or remind a child of a new or task-specific routine, create picture-based mini-schedules. For example, consider their new morning routine and create a mini-schedule with symbols and pictures. What tasks does the child need to complete to get out the door in the morning? This might include toileting, dressing, eating breakfast, washing up, donning their coat /backpack, and taking the bus. Depending on the child's level of independence, you may need to break down the routine into large or small tasks. Time Timer is a classic visual-aid product used in classrooms to help students understand the passing of time. Store visuals in portable wallets and communication books so your student has their visual reminders or communication aids with them at all times.
Some students stress about where family members are during the day while they are at school. Use family photos to create "people locators" showing where Dad or Mom will be during the day or who will be home with them after school. They can refer to this visual for re-assurance and hopefully avoid asking the same questions over and over.
Communicating Personal and Social Information
Any child facing a new teacher and peers needs to introduce them self. For children with special needs who have impaired communication, low-tech AT can help make a successful introduction. A Talking Photo Album is a great tool for using pictures, text, and voice to create an "About Me" book to show classmates their interests, abilities, and assistive technologies they use. It can be especially helpful as an introduction for a new teacher. For ideas on what to include in a teacher information packet, see the article on preparing the school for your child at the About.com link below and adapt these for a visual version. Students love to show pictures of their vacations and favorite things making a Talking Photo Album a great way to socialize with peers.
Read Social Stories Together
Stories about going to school offer important lessons for all children. Popular characters such as Arthur, Franklin, and the Berenstain Bears all have their concerns and questions about new teachers and making friends. See the link below for a recommended list of social stories you can share with your child in a comfortable, non-stressful way. Kids may want to read these over and over.
Make Back to School Fun
Plan a special trip to get your child with special needs involved in purchasing their school supplies. Use symbols or pictures to make a visual back to school shopping list. See the links below for free printables of back-to-school coloring activities and games.
With some planning and preparation on the part of parents and teachers, visual strategies and low-tech assistive technology can help students of all ages get back into the school routine and start the new school year with confidence.
Learn more from these resources:
- Back to School Books for Older Students:
- "5 Great Back to School Books" (about.com)
- Slatersoftware visual book
- Articles/Resources about Back to School:
- "Preparing the School for Your Child with Special Needs" (about.com)
- "Back to School Guide for Special Needs Families"
- for sale and for free at Say It With Symbols
- Pre-made symbol-based resources using Boardmaker at Boardmaker Share
- School Supply symbols from Slater software (pdf)
Randi Sargent is a parent of a teen with multiple disabilities who uses AT throughout his day for communication, mobility, and learning. She serves on the Board of Directors for the Federation for Children with Special Needs, Boston, and is a member of the AT Advisory Council for the Massachusetts's AT Act program (MassMATCH). Sargent is the founder/owner of Say It With Symbols.
|
|
|
|
|
12 Low-Tech Links and Downloads!
Resources for School and Beyond
1. ConnectABILITY's Visuals Engine
Here's a high-tech way to make a low-tech tool! Create communication boards using boardmaker symbols for free at this site. Template layouts for 1 to 16 images are provided, along with instructions for getting started and tips for different uses (including a link to a recorded workshop on visual communication). Thanks to Carrie L. Leonhart, M.S., CCC-SLP of PIAT (Pennsylvania's AT Act program) for sending this in!
 | | From the Tots 'N Tech site. |
Search low-tech AT and adaptations for use with infants and toddlers! Tots N' Tech is an inter-university collaboration between Thomas Jefferson University (TJU), Temple University (home to PIAT), and Arizona State.
 | Rich Fabend of Handihelp
|
includes detailed plans for this uniquely accessible garden box along with dozens of other low-tech, low-cost projects useful for persons with quadraplegia (daily living, mobility, recreation, in particular). Rich Fabend is a retired special educator with quadreplegia who created the site to share his ingenuity (and story).
provides pages of low-tech products for the classroom.
"homebuilt assistive devices" are shared by site founders Scott and Tom Jeary. Projects range from recreational equipment to toileting and may be browsed by environment: outdoor/sports/games, playroom, school, kitchen, bathroom, and bedroom.
6. Tools for Independence
A monthly low-tech AT newsletter for seniors put out by the Independent Living Partnership in California. Styled like a newspaper advertizing flyer of inexpensive helpful products. (Thanks to Scott Weissman of ND's IPAT for sending this in!)
This mother of AT databases includes Do It Yourself projects with descriptions and contact info for their designers/inventors. DIYs are integrated into any keyword search at the site (so if you look up Camera Mount for Wheelchair you'll see DIY as well as comercial products) They may also be browsed (all 43 pages at the link above).
18 projects are detailed with photos and instructions ranging from battery interrupters and soldering instructions to a pediatric bucket seat.
10. Utah AT Program's Pinterest pageStoree Powell writes that the Utah program is finding, categorizing, sharing, and disseminating low-tech ideas online via Pinterest. Their main audience is special educators. "Pinterest allows professionals and families to share their low-tech ideas with us also- and it helps us help others better. And it is FREE!"
A PDF from the Louisiana Dept. of Education AT Initiative.
Motor/Writing/Reading supports... ideas and products.
|
|
YouTube Low-Tech Highlights
 | | Assistive Technology in the Kitchen, a video by Jamie Prioli, ATP |
by Jamie Prioli, ATP, sponsored by the AT Advocacy Center of Disability Rights NJ.
Ever wonder why Therese Willkomm, PhD, is so interested in flag pole holders? This 3 minute video is one of 18 she included in an ATIA webinar of 101 AT solutions. All are available at the AT in New Hampshire You Tube channel. from those tech enthusiasts at INDATA (Indiana's AT Act program)! Low-tech and free tools available for older students and adults with developmental disabilities: scheduling, communication, cooking, computer access, and tools for fun. Presented by Debbie Drennen and Janet Nunez of Parents Helping Parent iTECH Center (thanks to the AT Network in California). Low-tech tools for communication, behavior and play (plus iPad/iPod apps for early learning). By Debbie Drennen and Janet Nunez of Parents Helping Parent iTECH Center (again thanks to the AT Network in California). Upbeat music to a slide show of examples of adaptive equipment for bathing, dressing, eating, toileting, etc. |
|
Back to School with Gene Rodgers!
Gene Rodgers is an entrepreneur with an MBA, a passion for community-based rehabilitation, and a love of adventure travel. He currently co-produces an Austin-based public access television program on disability issues.
Below Rodgers shares a few low-tech tricks and fabrications that helped him get through school with quadriplegia.
1. A secure laptop!
"I bought clips from a hardware store to put on my armrests. These clip to a bag on my lap. Now, no matter how many bumps I hit, my bag or briefcase will stay on my lap."
2. A wall-mounted computer!
"I mounted a computer to my wall so I could use it while in bed. Very low tech, but hard to find materials [at the time]."
3. Texas water bottle holder (for staying hydrated on campus!)
"I made a leather holster to hold my water bottle. It is lined with a cut-off plastic bottle to retain its shape. This holder won't bend or break, no matter how many walls I hit."
4. A custom writing brace!
"This writing brace was made from scrap metal and Velcro. I couldn't have got through school without it."
Email Rodgers with any device design questions. Also check out Geno's Place.org (where, among other fabrications, Rodgers explains the "sea legs" he invented to stabilize his wheelchair for sailing and other adventures). Truly, necessity is the mother of invention. Thanks to Gene Rodger for sending these in!
|
|
Build a Better Board Game!
Here's a way to adapt board games from Eileen Haddon, ATP
Materials:
- 1 board game (like Sorry)
- 2 metal cookie sheets
- super-strong magnets (discs) from a craft or hobby store
- 3M Super 77 multi-purpose adhesive spray
- Gorilla Glue
- 1 clear water bottle or metal paperclips and a "magic" magnetic wand (depending on if your game uses dice or cards)

Steps:
- Fold the board game in half and reinforce the crease with duct tape.
- Then open the board game up and lay it face down on newspapers or old easel tablet pages.
- With two metal cookie sheets ready, spray the back of the board game and the bottom of the cookie sheets with 3M Super 77 multi-purpose adhesive spray.
- Press the cookie sheets on to the back of the board game, leaving space for the center board crease. Press down hard, and then weigh the cookie sheets down on the game board. (A wrapped ream of copy paper on each cookie sheet works nicely.)
- Leave it to cure for at least 3-4 hours.
- Glue a magnet to the bottom of the playing pieces. (I use Gorilla Glue, which I learned about from Therese Wilkomm.)
- Again, press down on the pieces and let the adhesive cure for at least 3-4 hours.
Now you're ready to play the game! Using this light tech adaptation it is not necessary to have good fine motor control to put down a playing piece or push it along - the magnets work through the game board. The other advantage is that if the board game gets bumped, you no longer hear yells of "My piece was there!" I have found that one request for used cookie sheets at church typically yields at least ten of them. Since you're going to need more cookie sheets for communication and puzzles, take them all!
The cookie sheet concept is an original idea I had. Strategies I've learned from others include putting the dice in a clear water bottle - the dice are rolled by knocking the bottle over. Again, less fine motor control is needed and the dice don't get lost. If the game uses cards, as in Candyland, put metal paperclips on them and pick a card from the pile using an auto parts "magic" magnetic wand.
Have fun!
Eileen Haddon has been an Assistive Technology Access Specialist with the VT AT Program since 1998
|
|
Nifty Product: Tactile Adaptation Kit for Teaching Science
New from MDW Educational Services: the Tactile Adaptation Kit for teaching science. The kit is designed to introduce science concepts tactually, such as ionic compounds, electrons, bonds, Lewis Structures, etc.
Included are:
- Suggested Uses & Adaptations
- Magnetic Dry Erase Board
- Mini Glue Gun
- Glue Sticks
- Magnetic Letters & Numbers Marked with Braille
- Magnetic Flexi Ruler
- Various Magnets & Magnetic Strips
- Magnetic Backed Felt Sheets
- Magnetic Backed Foam Sheets
- Various Textured Dots
And MORE $129.00 plus shipping
Also available: the Multi Sensory Lab Gear Kit
Contact:
MDWEducationalServices
@gmail.com
(908) 565-1802
Learn more at this Independence Science Access Blog post
Reminder: AT Program News makes no endorsement, representation, or warranty expressed or implied for any product, device, or information set forth in this newsletter or on its Web site. AT Program News has not examined, reviewed, or tested any product or device referred to in this newsletter or at www.atprogramnews.com.
|
|
|
|
|


