| News from April 1930's
January 2011, Vol. 3, Issue 1
|
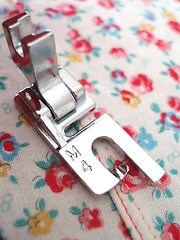
Flat-Felled Seams
 What is it? When do you use it? What is it? When do you use it?
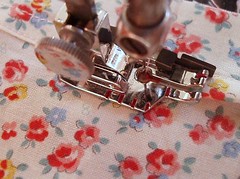
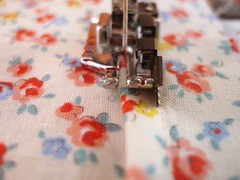
This e-mail Newsletter features a Sewing Tutorial
answering those questions as well as
photo-illustrations showing how to make
a Flat-Felled Seam in 6 Easy Steps!
Update: You will also find this tutorial featured
on the Oliver + S blog today, too!
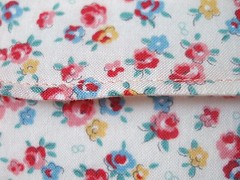
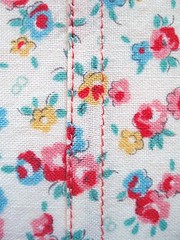
What is a Flat Felled Seam?
A flat-felled seam is accomplished by sewing two lines of stitching at the seam while simultaneously enclosing the raw edges of the fabric. This seam finish not only prevents unraveling or fraying, but makes the seam very strong. It also gives the finished garment a clean finish on this inside. A flat-felled seam is commonly found on denim jeans and men's dress shirts as well as on reversible garments. I've even seen this feature instructed in vintage patterns for boy's and men's pajamas. It adds one more touch of professionalism to a hand-made garment. 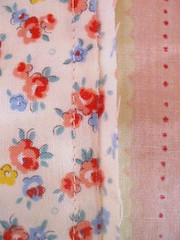
A finished Flat-Felled Seam
Do you remember "Sides to the Middle"?
Back in the 1920's and 1930's to conserve on well-worn sheets, there was only one thing to be done according to an old 1930's Singer Sewing Booklet.... "The sheet underwent that strange process known as "sides to the middle," and this will have painful memories for many who were small girls at the time. Sewing center seams seemed endless and there was often a nasty ridge running right down the bed, quite enough to spoil the rest of any light sleeper".
Perhaps, those center "sides to the middle" seams
should have been flat-felled center seams!
~~~~~~~~~~~~~~~~
For those of you who are curious about a Felling Attachment, then the new 4mm Feller Attachment is useful for 1/8" Flat-Felled Seams and is currently on sale for $16.95.
Further Tutorial Information illustrating the Feller Attachment can be found here.
~~~~~~~~~~~~~~~~
New Items to the Shoppe! 
Shiny Black Singer 301 (301A) Sewing Machine
$395.00
~ ~ ~ ~ ~ ~ ~ ~ ~ ~ ~ ~ ~

Singer Fashion Aids Attachments Case
Brown / Tan with Removable Insert Tray
$295.00

Fashion Aids Case ~ Perfect for porting all of your Sewing Machine Attachments!

~ ~ ~ ~ ~ ~ ~ ~ ~ ~ ~ ~

Oh! Before I forget....
a rare Singer Walking Presser Foot
"Penguin" ($595.00) just waddled into the shoppe.
Only one available, and they never last long!
~ ~ ~ ~ ~ ~ ~ ~ ~ ~ ~ ~
 Happy Valentine's! * 1920's Valentine Postcard believed to be from the time of Woman's Suffrage
I don't know about you, but something about the turn of a new year sparks a little bit of creative craftiness in me, and I look forward to the little projects so often related to Valentine's Day. This year I have decided to take on the task of sewing handmade Valentines, alongside my daughter, for her 1st grade class. She's writing short, little messages on plain fabric using an air-erasable pen and then I'm embroidering them following her own handwriting. I can't wait to show you as we get more finished because they are turning out so sweet and darling. These Valentines will hopefully be enjoyed and remembered by each student for many years to come. What about you? Do you have special Valentine's plans? I'd love to hear and see what you are making!
|